
 It's a wonderful thing when you find the perfect meal to match your mood. You know: warm stew for a cozy or cold night, cool salad on a hot night. But I think it's even more wonderful when you find a meal that works for you during any season or state of being. We found a dish last night that's so "us" it was funny: Chicken wraps with mango, rice, cucumber in carrots with lime dressing and a soy dipping sauce.
How is this dish perfect for us? Let me count the ways. First of all, it's do it yourself, and easily customizable. As we mentioned here (and demonstrated here and here), we love that kind of thing. Also, two key ingredients are lime (see previous two links and also here) and mango (see here and here), which we love. And furthermore, the whole concept is a wrap, and we adore wraps (too many recipes to link to, so just trust). In fact, we even eat but don't blog turkey wraps at least 3x per week for lunch. Add dipping sauce to the equation, and it's our dream dinner.
Fortunately, our dream dinner tasted as delicious as we thought it would -- how could it not? We spent a significant amount of time prepping so that our strips of mango and cucumber would look uniform, but the meal could probably come together in less than 45 minutes if you work quickly. The combination of the two sauces is unbelievably tasty, and these are healthy enough that you don't feel guilty popping five or six of them. You could serve these as an appetizer or snack, but be warned that you may not be able to halt consumption. They're that good.
Find the original recipe from Epicurious here, or see our adapted version below.
Ingredients (serves 4):
(wraps)
1 cup jasmine rice, rinsed
2 chicken breasts
2 tbsp olive oil
1 head Boston lettuce, leaves separated
1/2 cucumber, cut into matchstick-size slices
3 scallions, thinly sliced into 3-inch strips
3 carrots, shredded (in the food processor) or cut into matchstick-size slices
1 mango, peeled and cut into matchstick-sized slices
1/2 cup cilantro
(lime vinaigrette)
1/4 cup lime juice
3 tbsp oil
2 tbsp honey
pinch of salt
(soy dipping sauce)
1/2 cup seasoned rice vinegar
1 tbsp vegetable oil
6 tbsp mayonnaise
1/4 cup soy sauce
1/4 cup ginger, finely chopped
1/2 teaspoon Asian sesame oil
Instructions:
Bring 1 3/4 cups water to boil add rice and a pinch of salt. Cook covered until rice absorbs water, about 20 minutes. While rice is cooking, heat olive oil in a large pan. Add chicken and cook through, about 5 minutes per side. You can also grill the chicken if you prefer. Once chicken is cooked, shred it into small pieces by pulling it apart with two forks. Make lime vinaigrette by whisking together all ingredients, and soy dipping sauce by combining all ingredients in a food processor and blending until smooth. Dress the shredded chicken with the lime vinaigrette. Lay out all ingredients, stuff lettuce leaves with chicken and vegetables, dip in soy dipping sauce or add it into the wraps.


3.29.2008
Chicken Lettuce Wraps
3.26.2008
First Almond and Pear Tart
 We've never baked a tart before, but for our friend Nellie's birthday, we wanted to make something exceptional. Because we hadn't baked one, however, we encountered some issues having to do with the fact that we didn't know how. We selected a pear and almond tart recipe from Tartelette because hers always look so beautiful, but we found ourselves struggling with key terms and steps. We even resorted to the baking no-no of checking the oven every 5 minutes to make sure that our gooey mess was actually becoming a tart.
Thankfully, it did. I don't think that this will be the most delicious tart that we ever make, but I'm proud of our first attempt. The major flaws were in appearance. I forgot to peel the pears and my layering was less than perfect, so it ended up looking a bit more like moussaka than a tart. I also think that next time we'll select a recipe with a bit less cream. Still, it had the right amount of sweetness, and the pear/almond combo was, as expected, divine.
I think we learned more from this dish than we have from anything we've made in a while. We learned that blind baking means to bake without a crust, and that a small frying pan works well as a pie weight. We learned that a tart can take almost an hour to bake. The recipe we used was wonderful, but since it doesn't give cooking times, I'm going to post exactly what we did below. No guarantees on the times, so if you choose this, just be attentive and intuitive with your tart.
Ingredients:
(crust)
1 1/2 cups flour
1/2 cup powdered sugar
1 stick of butter
1 egg yolk
1-2 tbsp water, if needed
(filling, makes more than I needed)
4 ripe pears, peeled, cored and sliced
4 eggs
200 grams sugar (about .8 cups)
100 gr. ground almonds (about .4 cups)
1 cup heavy cream
1 tsp. vanilla extract
1 tsp almond extract (or you can just do 2 tsp. vanilla)
Instructions:
To make the crust, combine all flour, sugar and butter in a food processor and pulse until it resembles a course meal. Add yolk and pulse until it combines into a ball, adding water if necessary. Flatten into a disk and refrigerate for at least one hour. Preheat oven to 350. Roll out dough and place it in tart pan, bake with pie weights for about 15-20 minutes, until it is cooked. Leave oven on. In a blender or food processor, combine all filling ingredients except for the pears and mix together. Once crust is cool, arrange pear slices in the tart pan and pour cream over it. Bake at 350 for about 1 hour, until very golden and inserted knife comes out clean.


3.25.2008
Homemade Veggie Burgers
 Penn classes love pretentious names. Sophomore year, I took one of my favorite classes thus far: "Food: Biological, Medical, Psychological, Cultural and Historic Perspectives." Phew! Basically, this extremely brilliant and famous professor (quoted in such books as Michael Pollen's the Omnivore's Dilemma) lectured at us for three hours every week about why people eat the way they do. I learned that I'm not the only one with strange feeding behaviors regarding meat. Apparently, I'm normal to only eat certain animals, even though my choices often seem arbitrary to those unfamiliar with my twisted and self-serving logic.
The point, however, is that I consider myself well-versed in the art of the veggie burger. Some varieties I could eat everyday (Dr. Praeger's, Morningstar Farms Tomato and Basil), and others make me nauseated. Alex is similarly experienced with the dish, and we believe that the most important characteristic of the veggie burger is that it taste like a delicious vegetable patty, not like slab of fake meat.
The ultimate veggie burger recipe from Cooks Illustrated achieves this goal with distinction. The burger has a distinct flavor and an ideal soft (but not mushy) texture. We served it to veggie burger skeptics, and received overwhelmingly positive responses. Our vegetarian friend, Lara, even said that it re-inspired her vegetarianism after she spent weeks feeling less than enthused about it. Leave about an hour for prep, but these are well worth the time and steps.
Ingredients:
3/4 cup dried brown lentils
3/4 cup bulgur
2 tbsp vegetable oil
2 1/2 tsp table salt
2 medium onions, finely chopped
1/2 cup celery, finely chopped
1/2 cup leek or scallion, finely chopped
2 garlic cloves, minced
1 lb. white mushrooms, thinly sliced
1 cup unsalted cashews
1/3 cup mayonnaise
2 cups panko
Instructions:
Bring lentils to boil in 3 cups of water and a pinch of salt. Reduce to simmer and cook for about 25 minutes, until falling apart. Drain in a mesh strainer, dry and set aside. While lentils are cooking, boil 2 cups of water for bulgur, add bulgur and turn off heat. Let it cook until water is absorbed. Put bulgur aside. In a large pan, heat oil. Add onions, celery, garlic and leek or scallion, and cook for about 8 minutes. Set aside, then add mushrooms to the pan and cook until soft, about 10 minutes. In a food processor, process cashews until fine. Combine cashews, lentils, and bulgur with cooled vegetables and cashews. Add mayonnaise. Food process (pulse) in batches until mixture is cohesive but roughly textured. Stir in panko, and salt and pepper to taste. Form into 12 patties. Cook on the grill or in a pan, about 5 minutes per side. Serve with favorite fixings.


3.22.2008
Chocolate Chocolate Easter Cupcakes
 As mentioned earlier, we try to cook for holidays with a blind eye toward their religious affiliations (or lack thereof). But because Easter slipped past us last year, I admit that this marks my first attempt baking for the holiday. Originally, I wanted to go all out -- cupcakes with coconut nests and chocolate eggs. After some experimenting, however, it seemed too much, and we settled for just the eggs. It was a good thing too, given the already intensely rich creaminess of the icing, paired with the deliciously coconut almond chocolate cakes.
 In a word, these cupcakes were decadent. We designed them specifically for Alex's dad, a full-blown chocoholic, and I think they contain more chocolate than any item we've baked before. But though they didn't contain the lightness of a Spring day, they looked just as beautiful, and tasted as lovely as anything. The cake (thankfully) wasn't overly sweet, so it complimented the icing perfectly. We found the recipes for both the cake and the frosting on Epicurious, and since I wouldn't change a thing for either one, I won't bother reposting them. Just pop three Cadbury Mini-Eggs on each, and serve.

3.18.2008
Farfalle with Portabello Mushrooms
 This is one of the first dishes I learned to cook. I used to make it anytime I had to cook in high school, which speaks to its simplicity. It's perfect for a weeknight, but fancy enough to impress if necessary. I think portabellos frequently do that to a dish. This one is the kind of yummy that, even after we finished our plates, we kept sticking our forks back in the pot for a few extra pieces of pasta or mushroom. The rosemary makes it just perfect.
As always, we tried to make the dish more healthy by not adding the optional cream. And feel free to boost the mushroom to pasta ratio if you feel like it. Seriously, honestly, truly, anyone can make this dish successfully.
Ingredients:
16 oz. farfalle
4 portabello mushrooms, sliced and cut into 2-inch pieces
2 tbsp olive oil
2 onions, finely diced
1 clove garlic
2 tbsp tomato paste
1/2 cup red wine
3 tsp rosemary
1 tbsp parsley (dried, or finely chopped)
salt and pepper to taste
parmesan cheese, for garnish
Instructions:
Cook pasta in advance. Heat olive oil in a large pan, add onions and cook until soft, 2-3 minutes. Add portabellos and garlic, cook for about 5 minutes. Add tomato paste, wine and rosemary, and cook for about 5 more minutes until mushrooms are cooked. Adjust seasonings, add salt and pepper. Add pasta to the pan, and toss with mushrooms. Top with parsley, serve and garnish with shaved cheese.
Cook pasta in advance.

3.17.2008
Tea-poached Pears
 My favorite cookbooks and chefs love to talk about letting food inspire. I find this idea fascinating. Given that I have a rather compulsive personality, I generally find recipes far in advance, and make a list of all necessary ingredients before shopping. I become overwhelmed by options if I wander into a supermarket with an open mind, and I can never remember what I have at home to accompany the ingredients I find. I end up either overbuying, or arriving home to find out that I don't have half of the things I need to make the dish that I envisioned.
With farmer's markets, though, it's often a different story. Perhaps it's because the produce is so fresh that it requires nothing extra, or perhaps because the breezy outdoors inspire more creative thinking than my crowded grocery store. Alex and I go try to go to the markets with no clear ideas about what we want to bring home, and it yields pleasantly surprising results.
For example, last weekend at our local farmer's market, we found gorgeous red pears that somehow inspired us to try poached pears, though neither of us had attempted to poach fruit before. Not wanting to clutter them, we found a simple recipe on Epicurious that called for poaching them in Earl Grey tea. The result was subtler and far more interesting than any pear I've had poached in wine, and both of us loved the distinct and sweetly mellow taste. Though the recipe also asked for dried cherries and other fruits, we simply added raisins and craisins because they were the only things in the cabinet. I'd love to experiment with other fruits though, as I bet that dried mangoes and and such would go just as well. I'm posting our very simplified version below.
Ingredients:
2 cups water
2 Earl Grey tea bags
1/2 cup sugar
2 large firm but ripe pears, peeled and halved
1 cup dried fruit
Instructions
Boil 2 cups water. Add tea bags, and remove from heat. Cover and steep for 10 minutes. Remove tea bags, then add and dissolve sugar. Add pears and dried fruit. Cover and simmer until pears are tender, about 5 minutes. Transfer fruit to a bowl, and boil liquid until reduced to 3/4 cup. Pour over fruit and chill for at least 3 hours. Serve, with ice cream if you like.


3.15.2008
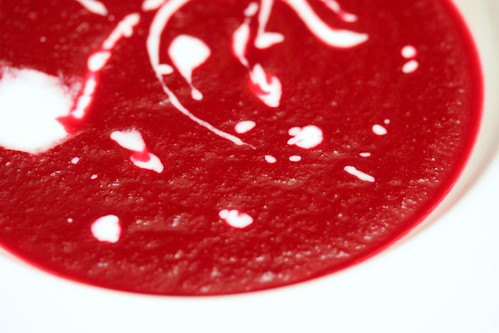
Borscht
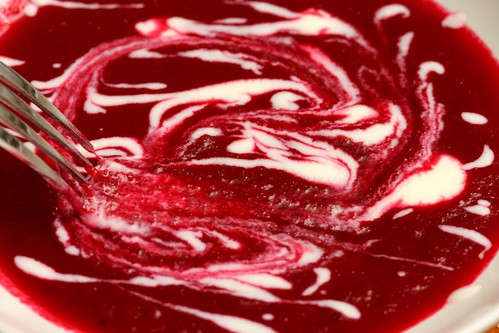
After finding beets at our farmer's market this morning, we created a delicious borscht based loosely on a recipe from Mark Bittman's How to Cook Everything Vegetarian. I love this version because it calls for roasting the beets, which give them a distinctly sweet flavor. Also, the recipe is extremely basic: just beets, onions, broth and lemon juice. We swirled in yogurt instead of sour cream for an all-around healthy and vibrant soup.
Ingredients:
approximately 3 lb. beets
1 onion, chopped
juice of 1 lemon
4 tbsp olive oil
approximately 6 cups chicken broth
yogurt to garnish
salt and pepper to taste
Instructions:
Preheat the oven to 350. Peel and halve the beets. Place in a roasting pan and drizzle with 2 tbsp olive oil. Roast for 20-30 minutes, until soft enough to pierce through easily with a fork. Let cool, then chop into small pieces. In a large pot, heat remaining 2 tbsp oil. Add onion, and cook for about three minutes until soft, then reduce heat and cook until golden, about 10 minutes. Add beets, and enough chicken broth to cover, about 6 cups. Bring to a boil, then let simmer for about an additional 20 minutes. In batches, transfer soup to a blender and blend until smooth. Return to pot, chill if you want, and serve with yogurt or sour cream.


3.09.2008
Hamantaschen
 We're usually not very good at posting holiday recipes very far in advance of the holidays, but this time we're on the ball. Purim is at the end of next week, but we've already made our first batch of hamantaschen. The recipe is from the only place to find a decent hamantaschen recipe these days: my mom's old synagogue cookbook.
So goes the dough, so goes the hamantaschen -- which means that creating a dough with perfect flavor and consistency is crucial. This recipe is great because it calls for just enough sugar, and results in a cookie that holds together well (far too many hamantaschen are overly crumby) but still gives a good crunch. As for fillings, anything goes! We used two pre-made fillings -- raspberry jam and poppy seed filling, but also did our own apple-pie filling by cooking apples together with sugar, cinnamon, raisins, butter and a bit of cornstarch. With this dough, however, I imagine that almost anything will taste great. Ingredients:
4 cups sifted flour
3/4 cup sugar
3 tsp baking powder
1/2 tsp salt
4 eggs beaten (+1 additional egg, beaten)
1/2 cup cooking oil
2 tsp vanilla extract
fillings
Instructions:
Sift together flour, sugar, baking powder and salt. Add 4 eggs, oil and vanilla. Blend thoroughly. Roll portions of dough onto floured board, 1/4-inch thick. Cut into 4-inch rounds (glass size). Place about a tsp of filling in center. Run a wet finger around the circumference of the dough and pinch edges together to form a triangle. Place on greased cookie sheet. Brush with 1 beaten egg mixed with a small amount of water. Sprinkle with sugar. Bake at 350 for 25 to 30 minutes. Makes 2 1/2 dozen.


3.08.2008
Fruit and Jasmine Rice Spring Rolls
 It's time we returned to some beautiful food. Though the last few things we've posted certainly tasted delicious, they weren't the most aesthetically pleasing dishes. Last night, however, we made a variation of the most interesting and gorgeous rice and fruit spring rolls from Vegetarian Times Magazine. We've made Vietnamese summer rolls with noodles and such before, but this sweet twist on the dish is meant to be served as a dessert.
The recipe calls for sweetening the rice with honey and vanilla, and features a coconut milk dipping sauce. But since we've been feeling more lactose-intolerant than usual these days, we nixed the dipping sauce and instead created our own duo of sauces: strawberry and caramel. We loved the result, and would definitely do this again. Rolling wet rice into rice paper is slightly more difficult than rolling the noodle combination, but we quickly got the hang of it, so don't become discouraged if the first few look a bit wonky. This is so lovely for serving to guests -- just sweet enough, pretty, simple. Ingredients:
1 cup jasmine rice
2 tbsp honey
3 tsp vanilla extract
4 kiwi, finely diced
10 strawberries, finely diced, 10 slices reserved
10 small spring roll wrappers
(strawberry sauce and caramel sauces):
1 cup frozen strawberries
sugar
Instructions:
Cook rice in two cups of water, honey and vanilla. Once rice is cooked, set aside and cool. Fold in diced strawberries and kiwis. Dip one spring roll wrapper in water for about 30 seconds, until soft. Lay on a flat surface; spoon about 2 tbsp rice mixture onto the spring roll and top with a strawberry slice. Roll spring roll tightly and tuck in sides. Repeat for all spring rolls, and refrigerate. To make the sauces, melt and mash strawberries in a saucepan with sugar to taste (probably about 1/2 cup). Strain if you like, and refrigerate until completely cool. Then, melt additional sugar into a caramel sauce by heating over low heat. Spoon strawberry sauce over a plate, and place a spring roll on top. Spoon caramel sauce over over top, and serve.


3.06.2008
Barbecue Chicken Pizza
 Alex's brother, Phil, is here visiting from Boston. We decided that we would make pizza for dinner, and were running through various topping options when I discovered the unthinkable: Neither Alex nor Phil had even heard of (not to mention, tasted) barbecue chicken pizza. We soon learned that this was because they were also oblivious to the existence of California Pizza Kitchen, a chain restaurant commonly found in malls and similar establishments that is widely known for this variety of pizza. I actually first tasted this incredibly yummy dish about six years ago, at a local pizza place near Sioux Falls, South Dakota. Random. I'm not a huge pizza person, but I became completely enamored by this amazing combination of toppings -- chicken, barbecue sauce, cheese and onions. So if you, like Alex and Phil (and Phil's friend Cassidy), are unfortunate enough to have gone so many years without this, start preheating your oven.
Though the ingredients are mostly self-explanatory, we sought guidance from a recipe for the pizza that we found on Epicurious. Out of 64 reviews, 97% said they would make it again, so we were sold. We ended up modifying it slightly because we forgot to buy red onions, and I'll post what we did below. Additionally, unlike with our last pizza successes, we were too lazy to make dough from scratch. Unfortunately, we didn't realize that the dough we bought frozen was gluten-free -- oops. The toppings completely made up for the odd consistency of the crust, however, and Alex, Phil and Cassidy were successfully inducted into the cult of barbecue pizza lovers.
Ingredients:
2 tablespoons olive oil
3 large boneless chicken breast halves
2/3 cup hickory-flavored barbecue sauce
7 ounces smoked Gouda cheese, coarsely shredded
1 onion, thinly sliced
1 green onion, chopped
Instructions:
Preheat oven to 450. Heat oil in a skillet. Season chicken with salt and pepper, add to skillet and sauté until just cooked through, about 5 minutes per side. Transfer to plate and rest for 5 minutes, before slicing chicken into strips. In a bowl, toss strips with 1/2 cup of the barbecue sauce. Roll out the dough, and fit it onto a baking sheet. Spread half of the cheese over the dough. Arrange chicken slices over the dough, then sprinkle onions on top. Drizzle with remaining barbecue sauce. Sprinkle with remaining cheese, and green onion on top. Bake until cheese melts and crust is crisp, about 14 minutes. Let cool a bit, then serve.

Lucky Muffins

I'm the person you hate, the person who picks the charms out of the Lucky Charms cereal box. You may also know me as the person who only eats the icing off cakes, or -- and I swear this only happened once -- the person who licks the cheese powder off cheesy pretzels. I just want to eat what I like, and I loooooove those little charms. I love their crunch and I'm cheered by how bright and artificial they are. The idea of designing a muffin around them is one that I'd been toying with for a while. I first thought about baking a cereal-based muffin a few months ago, but when deciding which cereal to incorporate, I couldn't get these charms out of my brain (my mind grapes -- 30 Rock, anyone?) So though this version doesn't have actual cereal, stay tuned, because this is only the beginning of a wonderful journey into the unknown world of cereal muffins.
I was pretty nervous about these because I didn't know what exactly would happen to them in the oven. The great news is that the muffins themselves came out wonderfully. They looked a bit wacky because of the colors, but the charms melted the perfect amount, and even kept their crunch. The mediocre news is that I used a sub-par marshmallow icing recipe (I should have known from the proportions, but I was too excited to notice) and my icing came out wet. I didn't have more powdered sugar and I didn't feel like figuring something else out, so I just used gooey icing. The story ends happily, though, because the muffins tasted great and so did the icing, which eventually hardened. So the muffins look a little drippy, but they managed to retain the St. Patrick's Day look (and the deliciousness) that I originally aimed for!
I used the basic vanilla muffin recipe from our vanilla chocolate chip muffins, and simply substituted in the charms. I'm not going to post the marshmallow icing recipe that I'm used, but I'm sure there are millions out there that you can use and just dye a bit green with food coloring. Be sure to top your muffins with an extra charm for good luck!
Ingredients:
2 cups self-rising flour
1 tsp baking powder
1/4 cup butter
1/3 cup superfine sugar
1 1/2 cup marshmallow charms
2 eggs, lightly beaten
1 cup milk (skim works)
1 tsp vanilla extract
Instructions
Preheat the oven to 400. Line your muffin pan with paper muffin cups. Mix the flour and baking powder together in a large bowl, add the butter and rub it into the mixture. Stir in sugar. In a separate bowl, combine the eggs, milk and vanilla, then pour this mixture over the dry one. Mix in charms until combined, and spoon batter into the muffin cups. Bake for about 20 minutes, until well-risen and golden. Cool for about 10 minutes, and serve.


